安装

unicorn官网:https://www.unicorn-engine.org/

1
pip install unicorn   

使用

1
2
3
4
5
6
7
8
9
10
11
12
13
14
15
16
17
18
19
20
21
22
23
24
25
26
27
28
29
30
31
32
33
34
35
36
37
38
39
40
41
42
43
44
45
46
47
48
49
50
51
52
53
54
55
56
57
58
~ » ipython                                                  127 ↵ tea@teadeMBP
Python 3.8.0 (default, Sep 22 2020, 15:19:24)
Type 'copyright', 'credits' or 'license' for more information
IPython 7.19.0 -- An enhanced Interactive Python. Type '?' for help.

In [1]: import unicorn

In [2]: from unicorn import *

In [3]: from unicorn.arm_const import *
模拟执行的代码
# mov r0, #0x37;
# sub r1, r2, r3
In [4]: ARM_CODE = b"\x37\x00\xa0\xe3\x03\x10\x42\xe0"
...:
架构的类型和模式
In [5]: mu = Uc(UC_ARCH_ARM, UC_MODE_ARM)
In [6]: mu
Out[6]: <unicorn.unicorn.Uc at 0x10e682a90>

In [7]: ADDRESS = 0x10000
...:
取模运算
In [8]: ADDRESS % 0x1000
Out[8]: 0
传入地址和大小
In [9]: mu.mem_map(ADDRESS, 0x1000)
写入代码
In [12]: mu.mem_write(ADDRESS, ARM_CODE)
给寄存器赋值
In [13]: mu.reg_write(UC_ARM_REG_R0, 0x1234)
...: mu.reg_write(UC_ARM_REG_R2, 0x6789)
...: mu.reg_write(UC_ARM_REG_R3, 0x3333)
添加hook代码
In [14]: def hook_code(uc, address, size, user_data):
...: print(">>> Tracing instruction at 0x%x, instruction size = 0x%x" %(
...: address, size))
...:
添加hook 返回值是hook id
In [15]: mu.hook_add(UC_HOOK_CODE,hook_code,None,ADDRESS,ADDRESS+0x100)
Out[15]: 140477808707440
开机 trac被执行 2条指令被执行
In [16]: mu.emu_start(ADDRESS,ADDRESS+len(ARM_CODE))
>>> Tracing instruction at 0x10000, instruction size = 0x4
>>> Tracing instruction at 0x10004, instruction size = 0x4
查看执行
In [17]: mu.reg_read(UC_ARM_REG_R0)
Out[17]: 55
In [18]: 0x37
Out[18]: 55
In [19]: mu.reg_read(UC_ARM_REG_R1)
Out[19]: 13398

In [20]: hex(13398)
Out[20]: '0x3456'
r1=r2-r3
In [21]: hex(0x6789-0x3333)
Out[21]: '0x3456'

实例

链接: https://pan.baidu.com/s/1rDkZA1Ma5WdLPpiyVPfXNg 密码: 62cl
实际调试libnative-lib.so
环境:Python 3.8.0
sign.py

1
2
3
4
5
6
7
8
9
10
11
12
13
14
15
16
17
18
19
20
21
22
23
24
25
26
27
28
29
30
31
32
33
34
35
36
37
38
39
40
41
42
43
44
45
46
47
48
49
50
51
52
53
54
55
56
57
58
59
60
61
62
63
64
65
66
67
68
69
70
71
from unicorn import * #导入包
from unicorn.arm_const import * #导入常量
import binascii

#设置hook
def hook_code(uc,address,size,userdata):
print(">>> Tracing instruction at 0x%x, instruction size = 0x%x" % (address,size))
#内存异常的
def hook_memory(uc, access, address, size,value,userdata):
# 什么地方异常的 访问地址
pc = uc.reg_read(UC_ARM_REG_PC)
print("memory error:pc:%x address:%x size:%x"%(pc,address,size))

a1 = b'123'

#定义一个虚拟机对象 架构 模式 +2就是THUMB指令集
mu = Uc(UC_ARCH_ARM, UC_MODE_THUMB)
#把so加到进程里
#image
image_base = 0x0
# 大小8m的镜像
image_size = 0x10000 * 8
#分配
mu.mem_map(image_base,image_size)
#载入文件 rb模式载入
binary = open('libnative-lib.so','rb').read()
#镜像写到虚拟机内存里面
mu.mem_write(image_base,binary)

# 运行函数需要个栈 stack
stack_base = 0xa0000
#3m
stack_size = 0x10000 * 3
# 栈的指针是向下增长的 减4个字节
stack_top = stack_base + stack_size - 0x4
#分配下stackbase
mu.mem_map(stack_base,stack_size)
#设置下寄存器 reg
mu.reg_write(UC_ARM_REG_SP,stack_top)

# data segment
#传参数需要数据段
data_base = 0xf0000
data_size = 0x10000 * 3
mu.mem_map(data_base, data_size)
# data_base是a1的地址
mu.mem_write(data_base, a1)
mu.reg_write(UC_ARM_REG_R0, data_base)

#fix got 修复
mu.mem_write(0x1EDB0, b'\xD9\x98\x00\x00')

# set hook
mu.hook_add(UC_HOOK_CODE,hook_code,0)
mu.hook_add(UC_HOOK_MEM_UNMAPPED,hook_code,0)
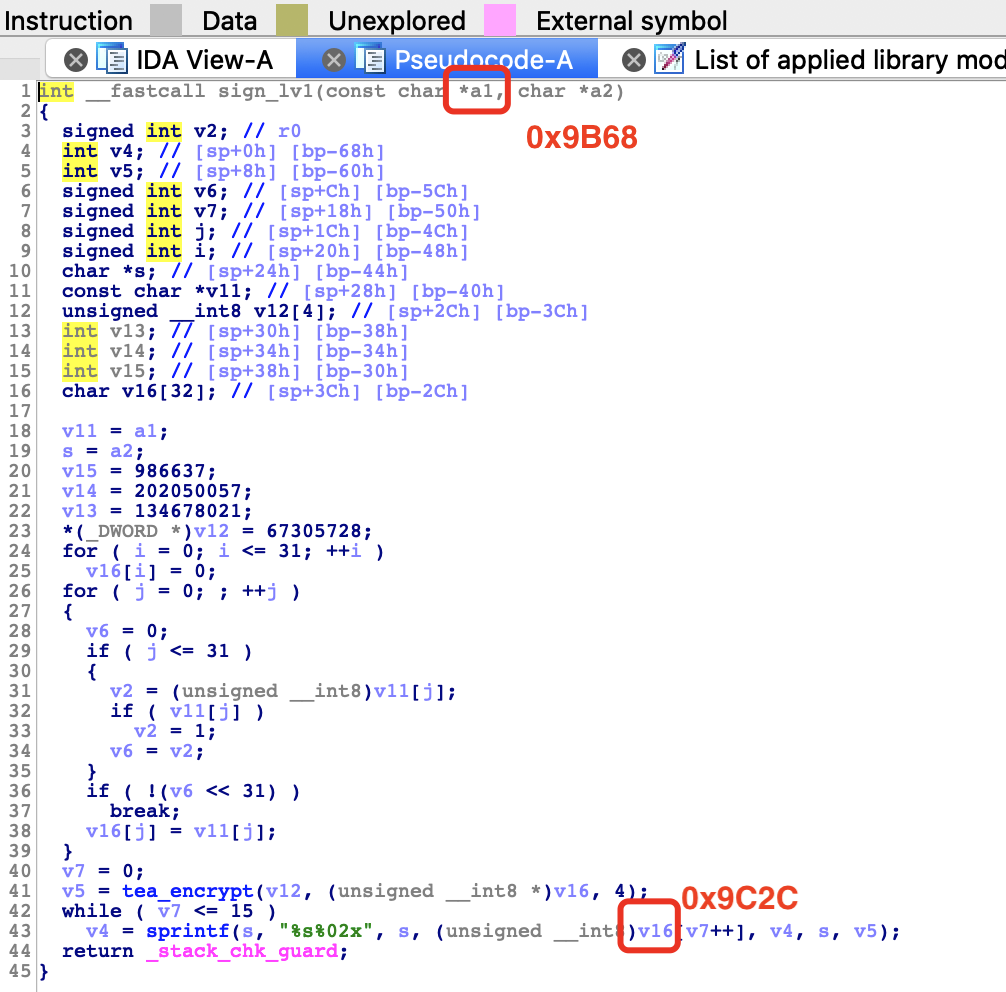
#函数开始地址
target = image_base + 0x9B68
#函数while循环 v16地址 循环了16次 就16位
target_end = image_base + 0x9C2C

#start
try:
mu.emu_start(target + 1,target_end)
r2 = mu.reg_read(UC_ARM_REG_R2)
result = mu.mem_read(r2,16)

print(binascii.b2a_hex(result))

except UcError as e:
print("tea111")
print(e)

加载so
找mainactivity然后找sign_1v1地址

找到sign函数起始地址

主要注意报错Invalid instruction (UC_ERR_INSN_INVALID) 需要手动修复表mu.mem_write(0x1EDB0, b'\xD9\x98\x00\x00')
修复表流程:
找到执行错误的地址回溯找到常量R12 0xc04
修复表地址 0x1E1AC + 0xc04
找到地址修复加上ida hexview添加的地址

执行:

1
2
 python sign.py       
b'304fc35f0a785d7b2ec27b1745725c38'

[原创] Unicorn 在 Android 的应用